Creating a VPC under Amazon AWS
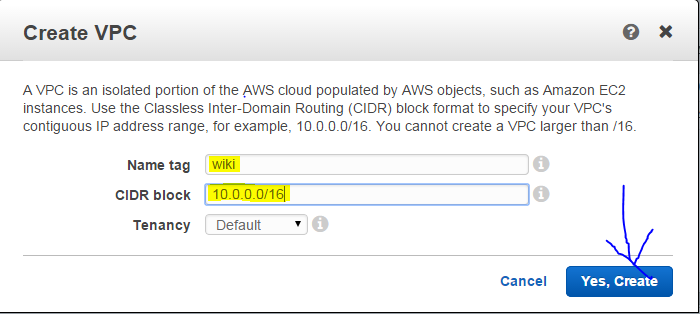
1. Creating a VPC for the for the content management (Wikimedia) which can be used for the launching the of the Webservers as well as DB servers. Click on the VPC in the Dashboard and click the Create VPC.

2. Next you need to Tag your VPC and specify the CIDR (Classless-Inter Domain Routing) block range and Tenancy(default runs on shared hardware) there are also some limitations of dedicated Tenancy as EBS volumes will not run on single-tenant hardware.
3. Next you need to create the subnet range which your instances will be using when you launch under this VPC. Under Subnets , Click “Create Subnet”.

4. You will need to specify the name , select the VPC under which this subnet would be created , select the availaibility zone for the subnet and specify the CIDR block range which would be between /16 netmask and /28 netmask. You will need to create the multiple Subnets under different availaibility zones for the high availaibility depending on the region and kind of fault tolerance and uptime you looking for. You would only be able to create the instance under the AZ only if particular subnet is associated with it under that VPC.

5. Create the 2nd public subnet in the another AZ.

6. Next create the 1st private subnet which would be used by the DB instance.

7. Create the 2nd private subnet in another AZ.

8. Next you need to create the Route Table to specify how the packets are transferred between your instances and the Internet. Click on the “Create Route Table”.

9. Select the Name tag for your route table and specify the VPC it will be using.

10. You will need to create an Internet Gateway for your public instances to interact with the Internet. It act as an virtual router to connect to the internet. Unless you associate an Internet Gateway with your VPC you would not be able to connect to your Instances over the Internet. Click “Create Internet Gateway” .

11. Create a name tag for your internet Gateway so you can recognize easily which Internet gateway is associated with which VPC. Once you enter the name click “yes, create”.

12. Once you have Created the Internet Gateway select the “Attach to VPC” to associate with your VPC.

13. Select the VPC you just created.

14. Now you need to associate your Internet Gateway with the Route you earlier created. So select the route you earlier created and at the bottom select the “Routes” and click Edit.

15. Since we going to connect the public instances to the Internet enter the destination address as 0.0.0.0/0 and select the internet gateway you just created and click save. This will connect your VPC to the internet with the Internet Gateway(Virtual router).
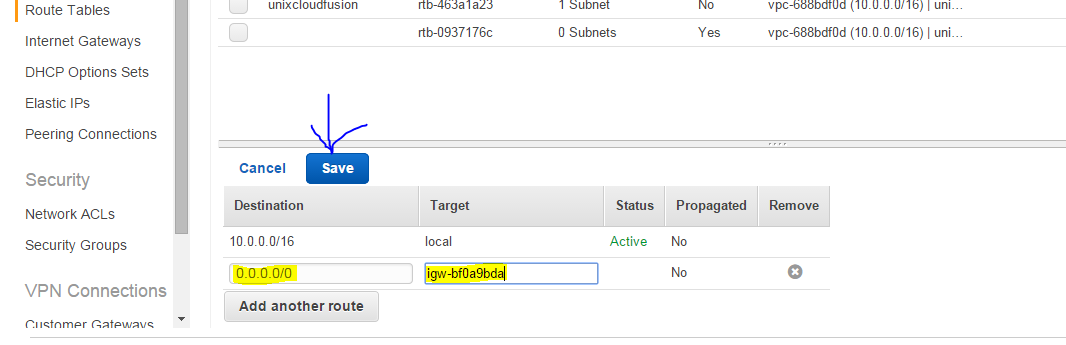
16. Check the status of the intenet gateway you just created should be Active now.

17. You will need to associate the subnet with this Route. Click on the Subnet Associations.

18. Since this is the public subnet (Internet Gateway Attached) we would only attach the public instances i.e. our Web instances which need to communicate over the internet to this Subnet. Select the two public subnets we created earlier and click Save.

19. That’s all for creating the VPC , next we are going to create the DB instance under this VPC and then would be working on launching on the EC2 instances under this VPC .
Comments
Post a Comment